


Whether you’re gluten free or not, this gluten free pizza crust is sure to be a favorite! It’s naturally vegan, easy to make, perfectly chewy with a sightly crispy crust.
Alright ya’ll. Developing a gluten free pizza crust recipe was HARD. Especially a gluten free AND vegan pizza crust. But way too many attempts, I finally got it!
This gluten free crust tastes just like a regular pizza crust, texture, flavor and all. I promise, if you tasted this without knowing what it was made of, you’d have NO idea it was gluten free.
It’s all thanks to a special blend of flours which includes white rice flour, tapioca and corn starch to hold it all together. These three combine to form the perfectly fluffy, airy, moist, sturdy, chewy yet crispy pizza crust.
Some pizza crusts are made with eggs, but this recipe doesn’t need it thanks to the blend of flours that holds everything together, so it’s naturally vegan! Try my vegan pasta bake next!
How to make vegan gluten free pizza crust
The first step is to combine the yeast, warm water and sugar or honey in a bowl. I like using honey, but if you follow a strict vegan diet, regular sugar is fine. Maple syrup may work, but it’s not best from a flavor point of view.
Combine the rice flour, tapioca corn starch, baking powder, salt, psyllium husk powder and garlic powder in a large mixing bowl.
Pour in the water/yeast mixture, oil and apple cider vinegar.
Use a wooden spoon to mix until combined. There should be some air bubbles and should be moist, and definitely not too wet or dry.

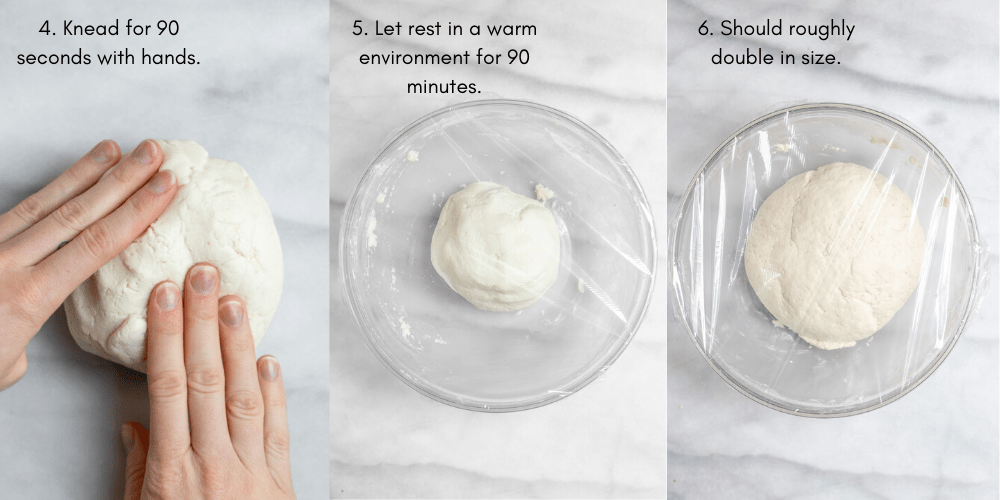
Transfer to a clean surface and knead with your hands for 90 seconds. I suggest setting a timer because if you knead for too long it can make the dough gummy, but too little and it won’t rise properly.
Transfer back to the bowl, cover with plastic wrap and let sit in a warm and dark environment for 90 minutes to 2 hours. If it’s a cold day, preheat the oven to 110 Fahrenheit, turn it off and then the dough sit in the off oven. Otherwise, in a regular off oven or the warming drawer below the oven is perfect.
After about 90 minutes, the dough should roughly double in size. If your dough doesn’t rise much, that is likely an indicator that your yeast was old, expired or inactive.
You can absolutely still make the recipe, it’ll taste delicious, but the texture may not be the same as the original recipe.
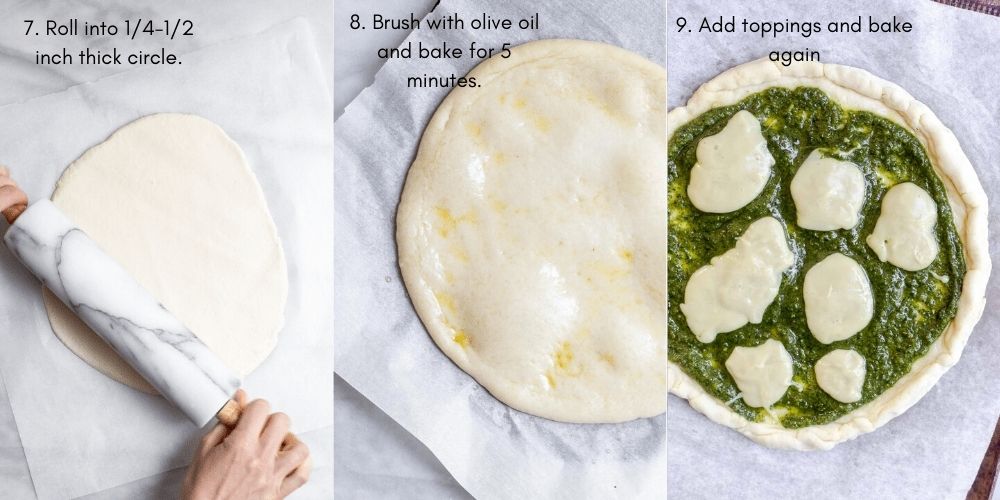
Transfer the dough to a piece of parchment paper and roll into about 1/4-1/2 inch thick, creating a slight lip with the edge of the crust if desired. However, you can really make this pizza crust as thick or as thin as you like.
Brush lightly with olive oil and bake for 5 minutes once the oven has heated. The oil will aid in the cooking process and help the crust brown up on the edges so it gets a bit crispy.
I brush the entire crust, but you can focus mostly on the outer portion of the crust where there won’t be any sauce.
Remove from the oven, add sauce and desired toppings and bake for an additional 10-15 minutes. Remove from the oven, slice and serve warm.
Tips for cooking with yeast
If you’re at all intimated by cooking with yeast, don’t be! It’s honestly just as easy as cooking a pizza crust with no yeast, just takes a bit more time. The main thing you need to be aware of is temperature.
A lot of people will tell you there is no need to activate instant yeast with water/sugar before adding to a recipe, but I always do. It really ensures the yeast is properly active (from eating the sugar) and dissolves into the water and actually does what it is supposed to in the crust- help it rise.
When you pre-bake the crust, you will likely notice a few air bubbles forming (see the middle photo above), but this is actually good! It shows the yeast is active and doing its job.
When you combine the yeast with the water, you want the water to be WARM but not hot because it will kill the yeast. About 110 degrees Fahrenheit is ideal. If you have a kitchen thermometer, I highly suggest using it!
When the water is too hot, it will kill the yeast, not warm enough and it won’t activate. If you don’t have a thermometer, it should feel like a warm bath temperature wise.
Also, it’s important to use instant or quick rise yeast for this recipe. Regular yeast will work, but it won’t yield quite as fluffy a texture since it needs to prove for longer.
Can I use a different flour?
I do not recommend making any flour substitutions with this recipe. I have tested with brown rice flour, store bought gluten free blends, and other starches, and it often turns out gummy. This blend turns out perfectly every time so keep it as is for best results!
Be sure to spoon and level all of the flours. Do not scoop right from the bag. The measurements need to be pretty exact to avoid a gummy or dry crust!
How to store and freeze
Once prepared, this pizza will store in the fridge for 2-3 days. Reheat in the oven (ideally not microwave) for best results.
This crust can be frozen after it has par-baked. After it bakes for 5 minutes, remove from the oven and let cool completely. Carefully (but tightly) wrap in plastic wrap and store in the freezer for 1 month.
When you’re ready to eat, top with toppings and bake as usual. You may need to add a few extra minutes of bake time to account for the colder temperature.
Topping Suggestions
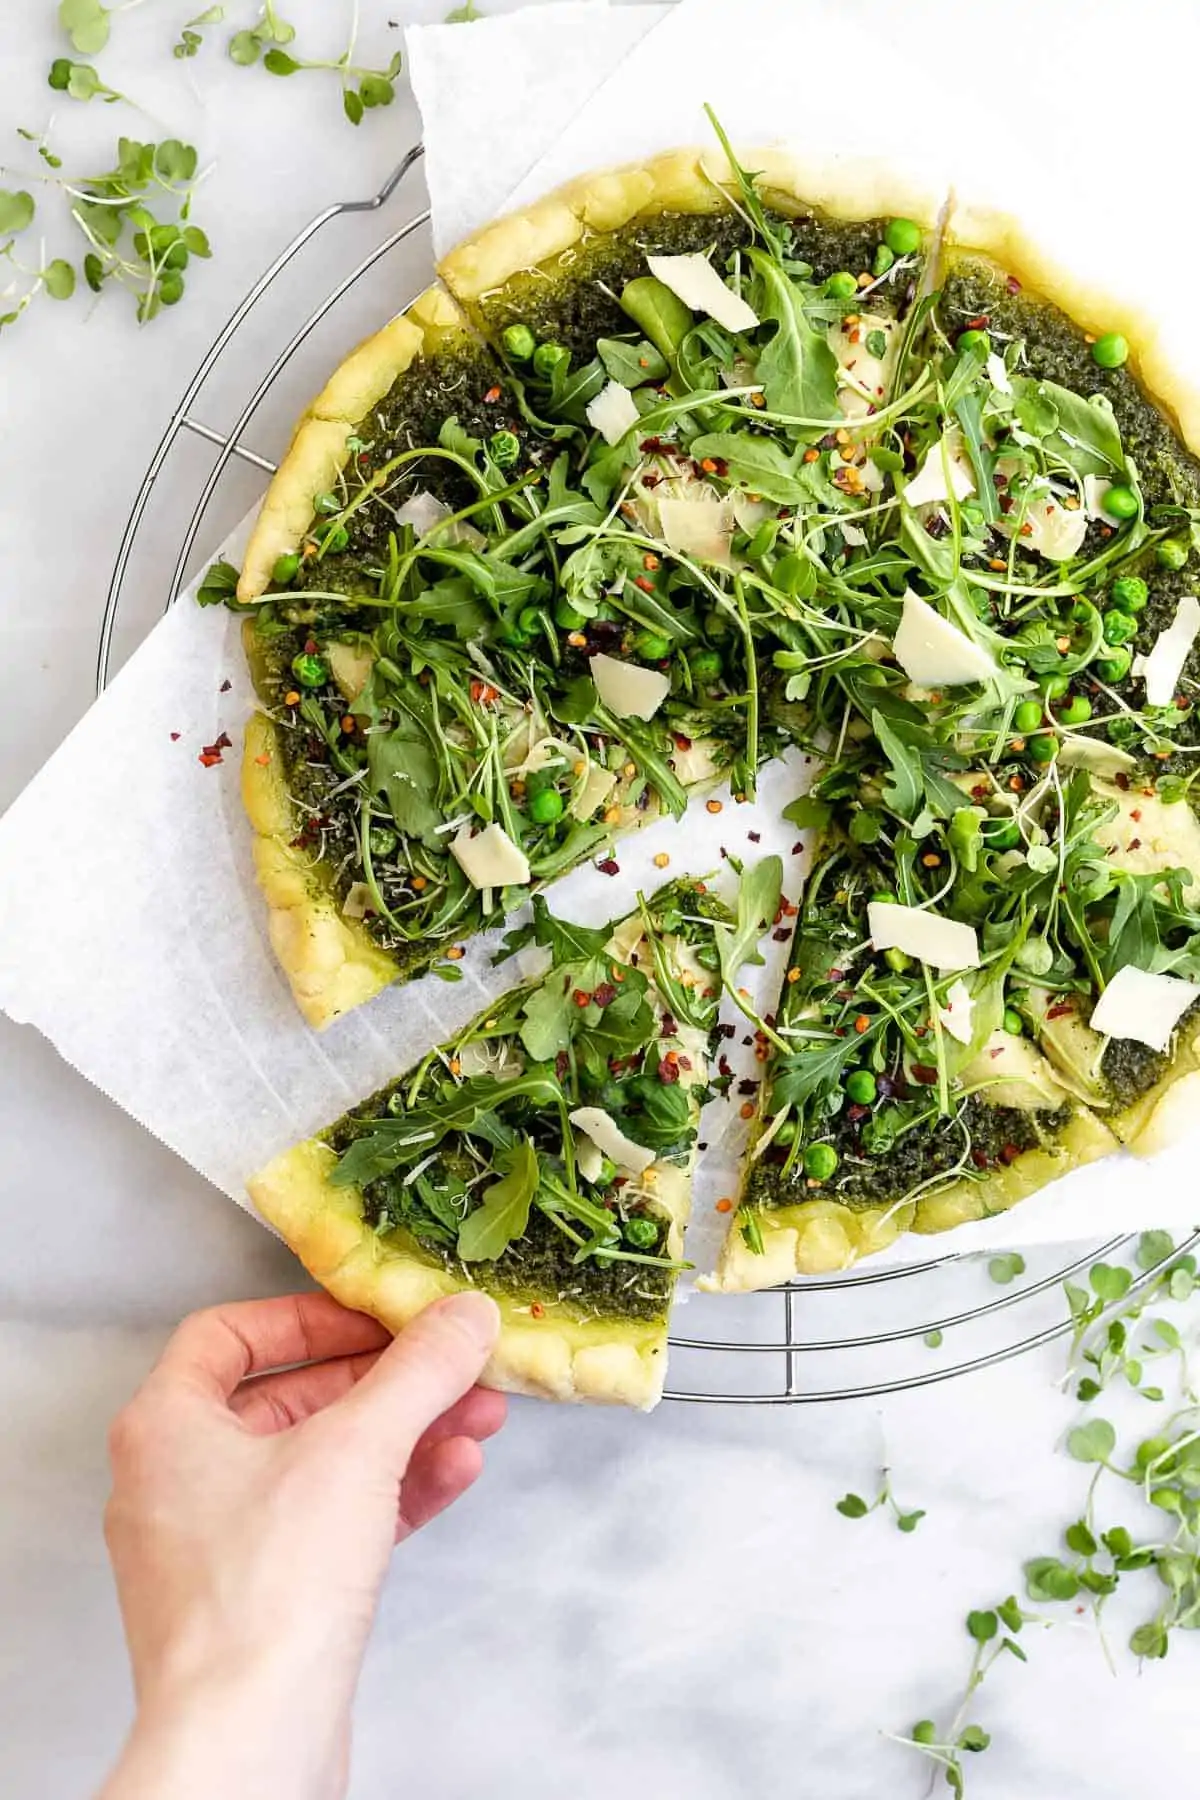
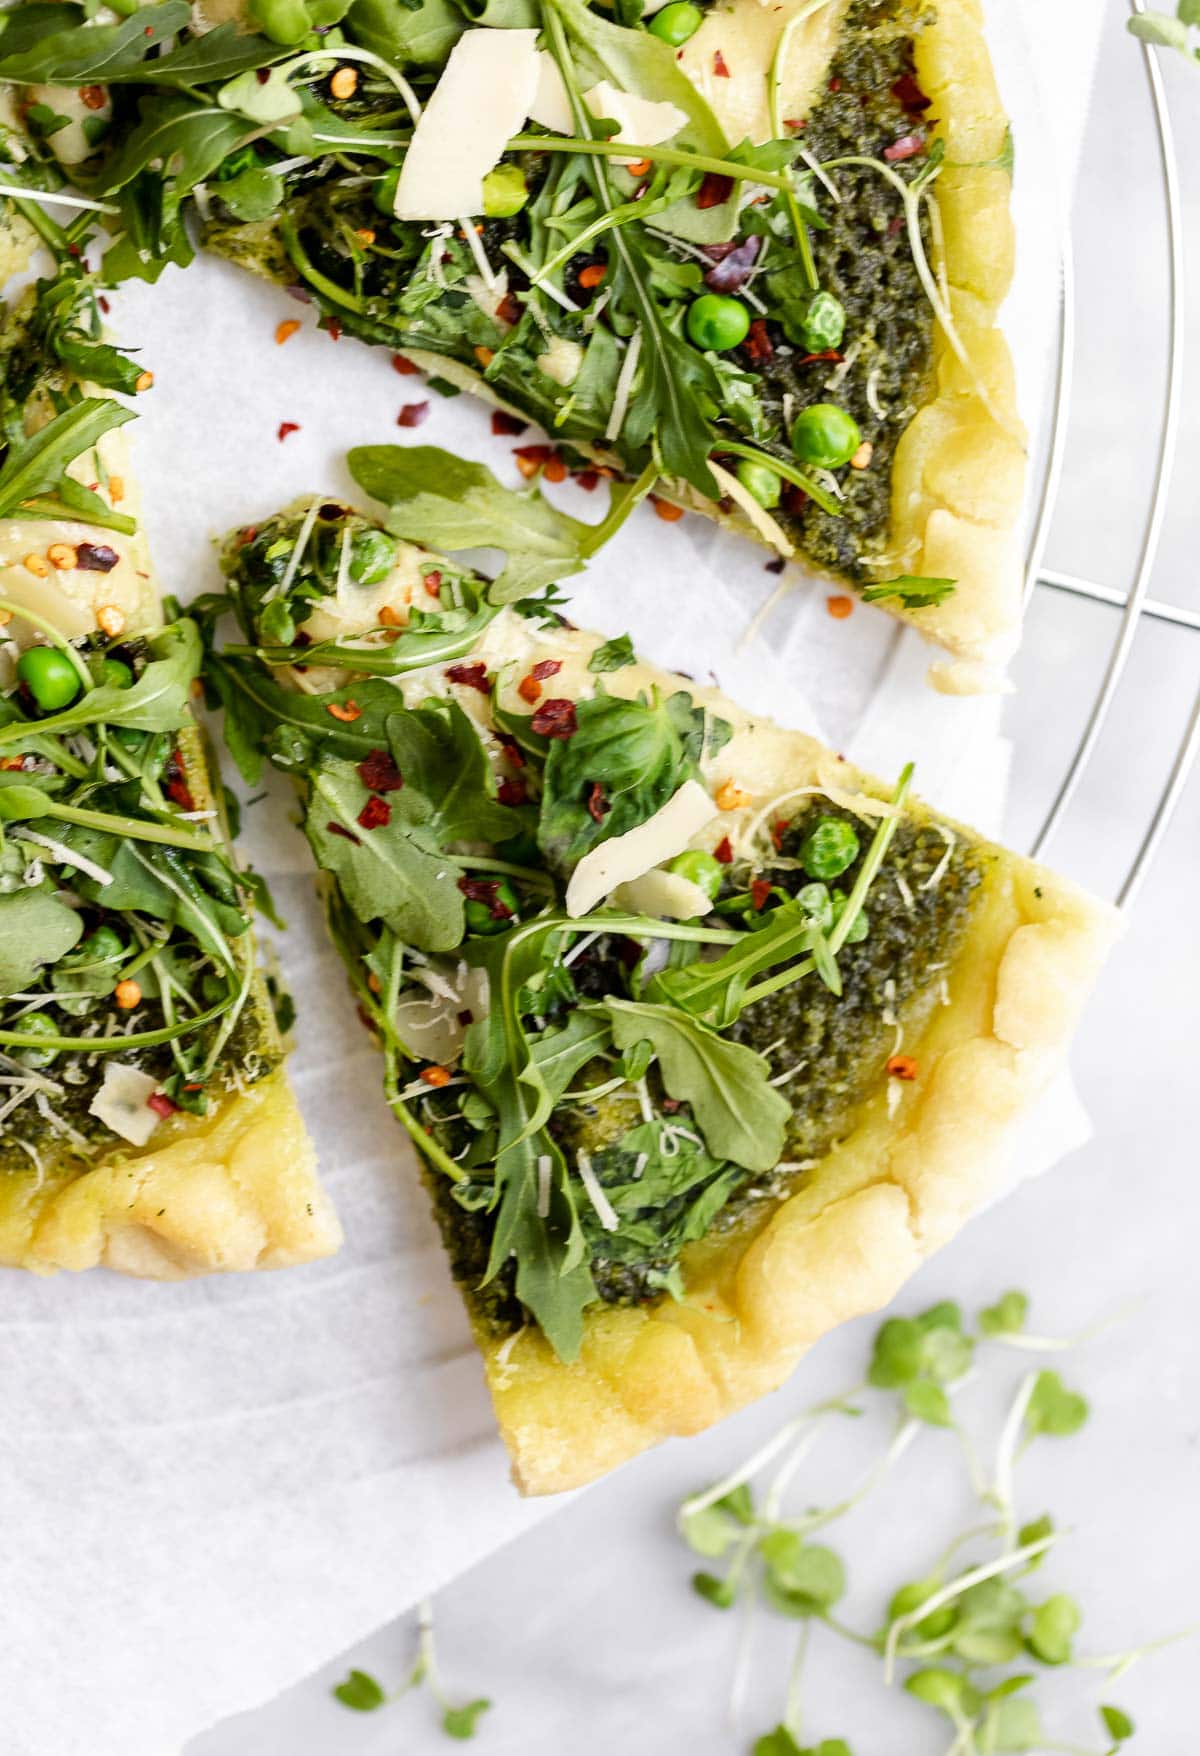
I make two crust to show a few different topping ideas (and because why not?!), but when it comes to pizza, you can top it however you like!
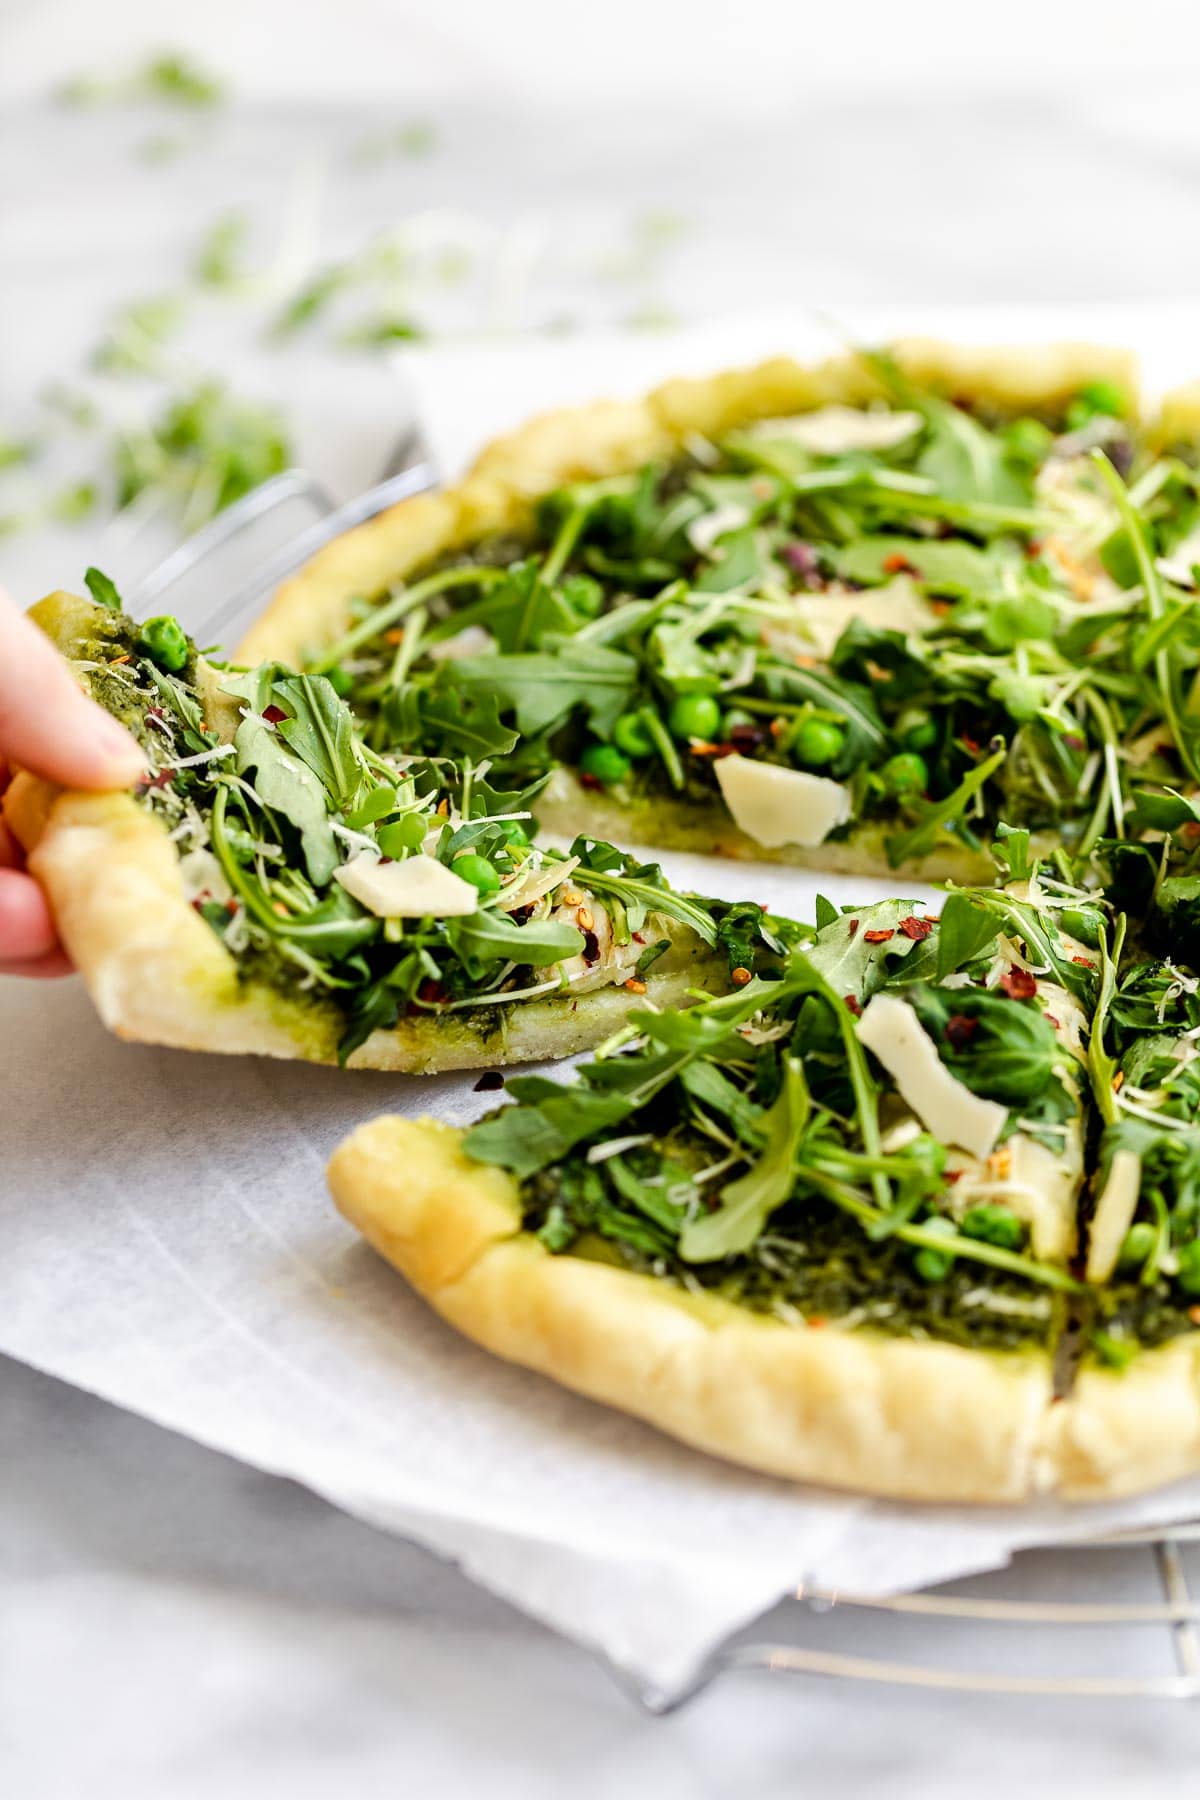
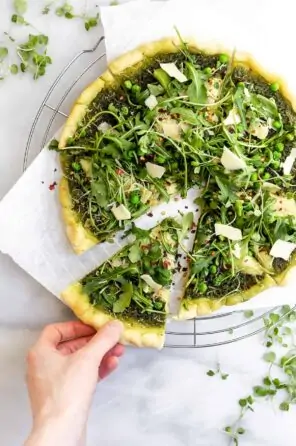
For one, I used my homemade pesto, Miyoko’ Mozzarella, and then after it baked topped it with arugula, basil and parmesan.
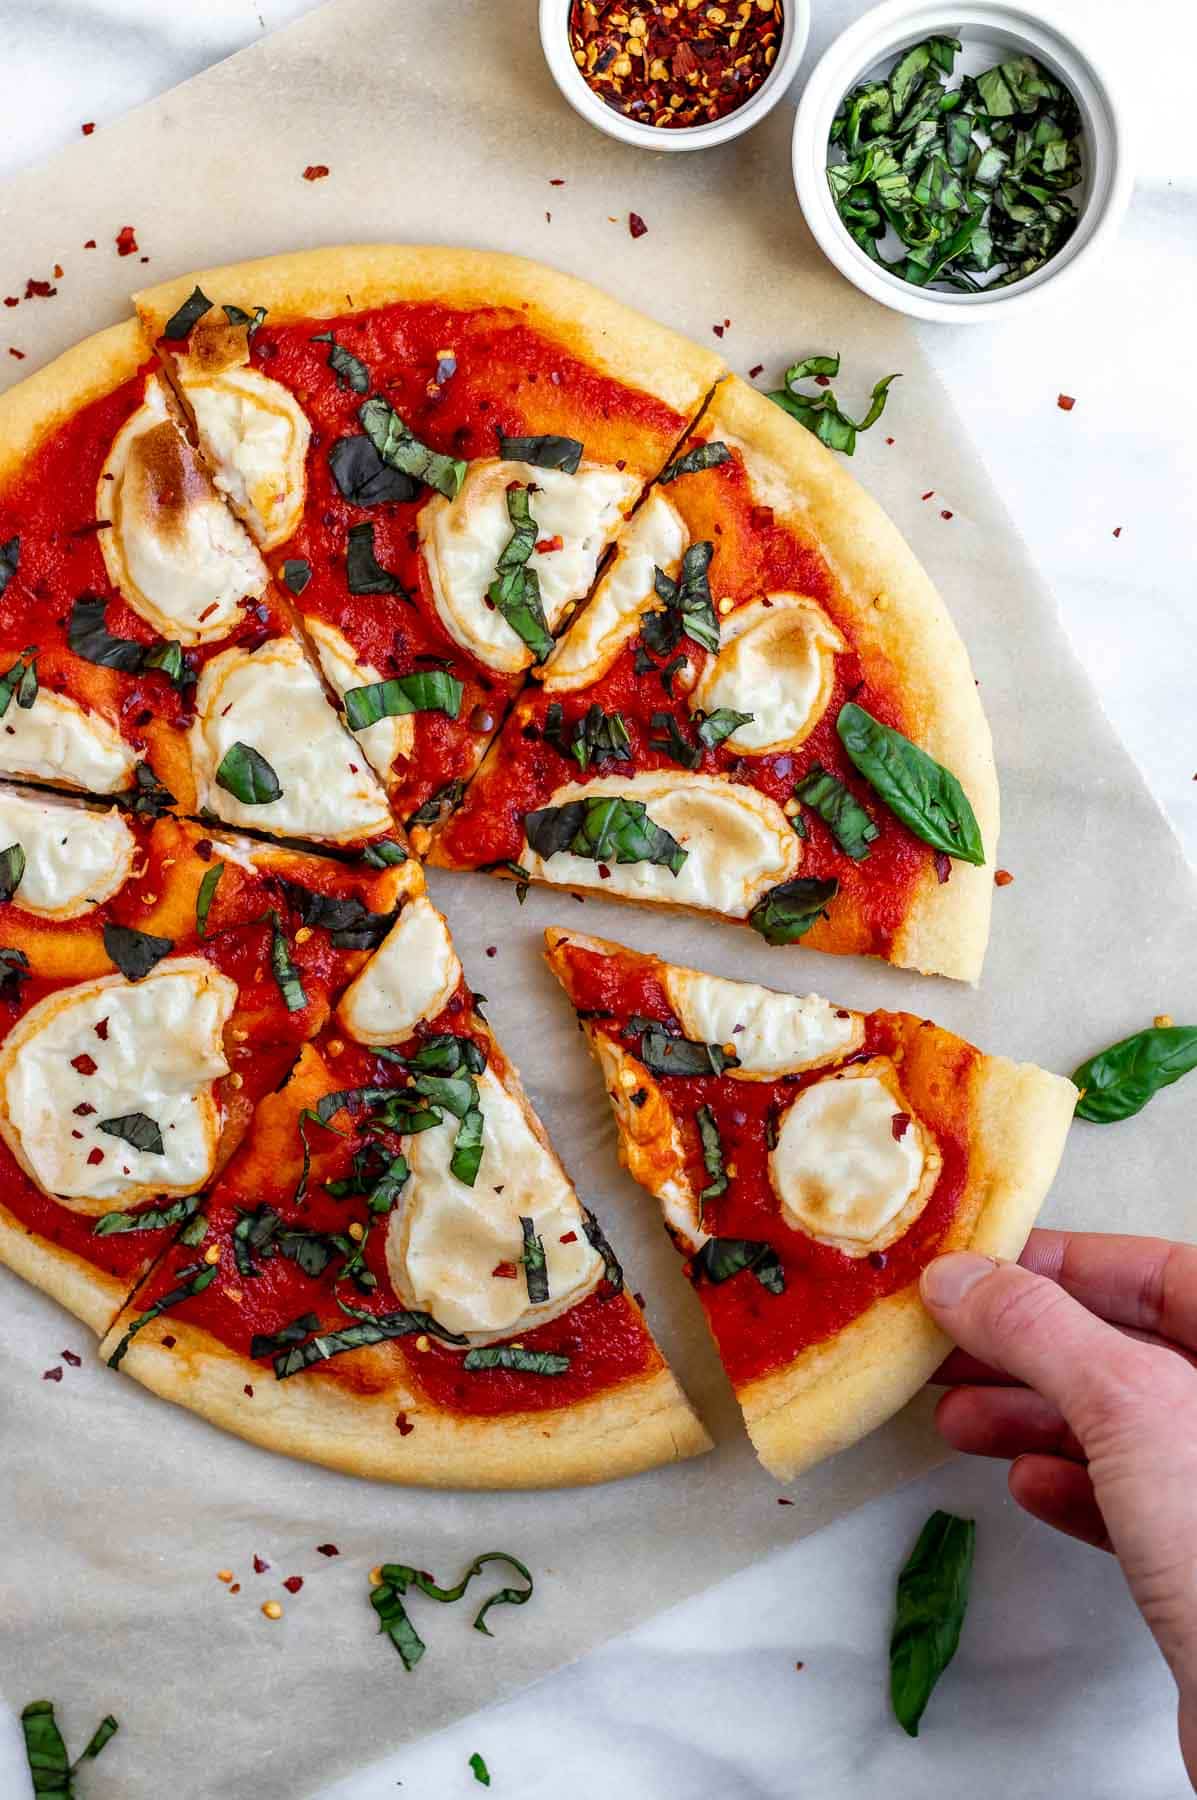
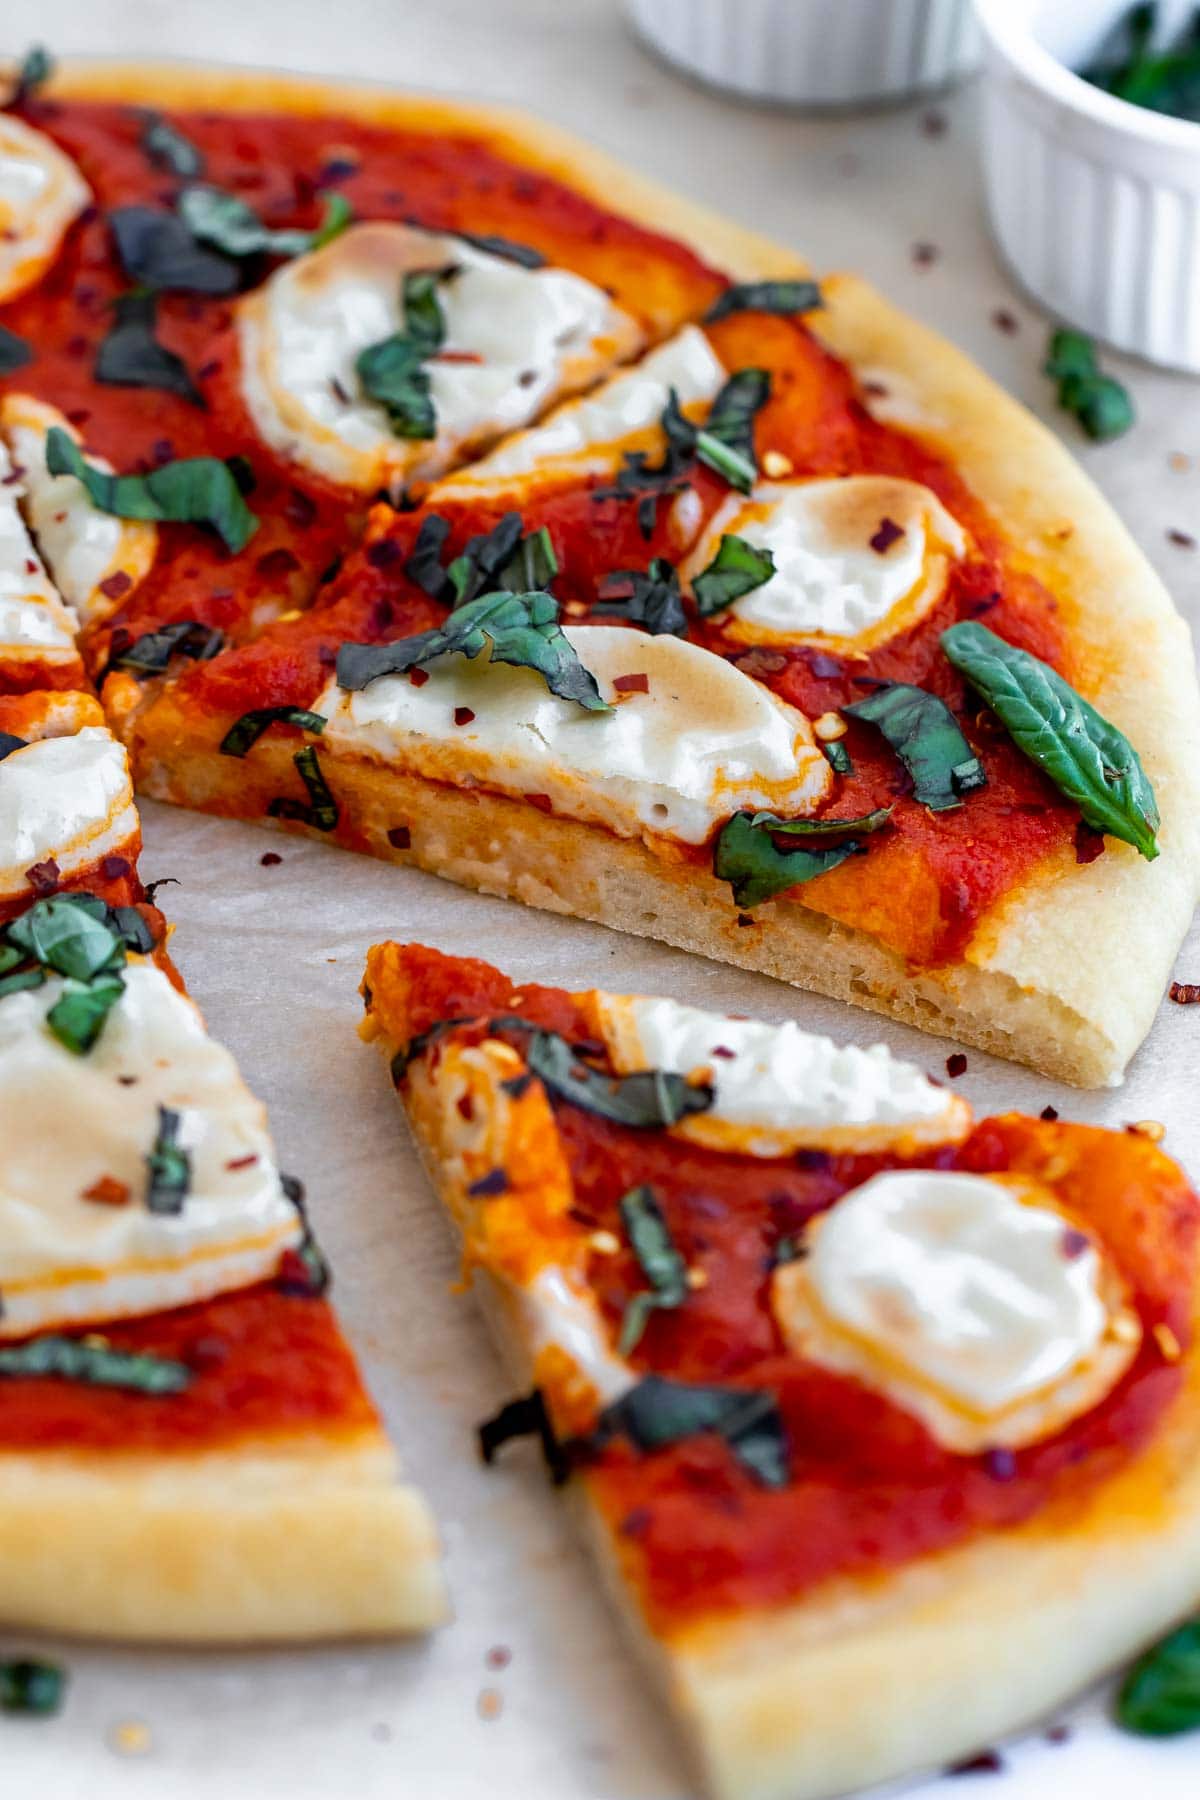
For another, I used regular tomato sauce, Ela Vegan’s cheese sauce for the mozzarella, and then fresh basil when it was done baking!
You can use mushrooms, any veggies you like, cheese or dairy free cheese, sausage, or pineapple if that’s your kind of thing!
Try these next!
Lastly, if you want more recipes straight to your inbox, be sure to subscribe to my email list. As always, tag me on instagram if you make this recipe so I can see your creation! Be sure to comment and leave a review if you like this recipe!
The Best Gluten Free Pizza Crust (Vegan)
by: claire cary
Ingredients
- 1 cup white rice flour spoon and leveled
- ⅔ cup tapioca flour spoon and leveled
- ⅓ cup corn starch spoon and leveled
- 1 tbsp baking powder
- ½ tsp salt
- ½ tsp garlic powder
- 1 tsp psyllium husk powder
- 1 packet instant/quick rise yeast
- ¾ cup + 2 tbsp warm water
- 1 tsp apple cider vinegar
- 1 tbsp honey or white sugar
- 1 tbsp olive oil
Instructions
- Combine the yeast, warm water and sugar/honey in a bowl. You want the water to be warm but not hot because it will kill the yeast. About 110 degrees Fahrenheit is ideal.
- Stir and let sit.
- Combine the rice flour, tapioca corn starch, baking powder, salt, psyllium husk powder and garlic powder in a large mixing bowl. Be sure to spoon and level the flours into the measuring cups, don't scoop right from the bag.
- Pour in the water/yeast mixture, oil and apple cider vinegar.
- Use a wooden spoon to mix until combined. If it seems dry at all, just add 1-2 tbsp more warm water as needed. it should resemble a standard pizza dough. If it cracks too much when you press down for kneading (a little cracking is ok) add a smidge more water.
- Transfer to a clean surface and knead with your hands for 90 seconds. I suggest setting a timer because if you knead for too long it can make the dough gummy, but too little and it won't rise properly.
- Transfer back to the bowl, cover with plastic wrap and let sit in a warm and dark environment for 90 minutes to 2 hours. If it’s a cold day, preheat the oven to 110 Fahrenheit, turn it off and then the dough sit in the off oven. Otherwise, in a regular off oven or the warming drawer below the oven is perfect.
- After about 90 minutes, the dough should roughly double in size.
- Preheat the oven to 400 degrees Fahrenheit.
- Transfer the dough to a piece of parchment paper and roll into about 1/4-1/2 inch thick, creating a slight lip with the edge of the crust if desired. You can make it as thick or as thin as you like, just depends on your preference.
- Brush lightly with olive oil and bake for 5 minutes once the oven has heated.
- Remove from the oven, add sauce and desired toppings and bake for an additional 10-15 minutes. I topped mine with my homemade pesto, Miyokos Mozzarella, and then arugula, basil and parmesan after baking.
- Remove from the oven, slice and serve warm. Enjoy!


Marita Buttigieg says
Can’t find tapioca starch here.
Any substitute pl?
Am gluten & lactose free..
Claire Cary says
You can try arrowroot powder, but I’d try to find tapioca online if you can!